Marketing Cloud Next could be considered as an application seating on top of Data Cloud. Creating Segments in Marketing Cloud Next is fairly simple and relies on the Data Cloud segmentation feature. In this article we will explain how to create a segment step by step.
Creating a segment #
The very first step is to navigate on the ‘Segments’ tab of the Marketing App and then click ‘New’ to create a segment.

Selecting the way to create a Segment #
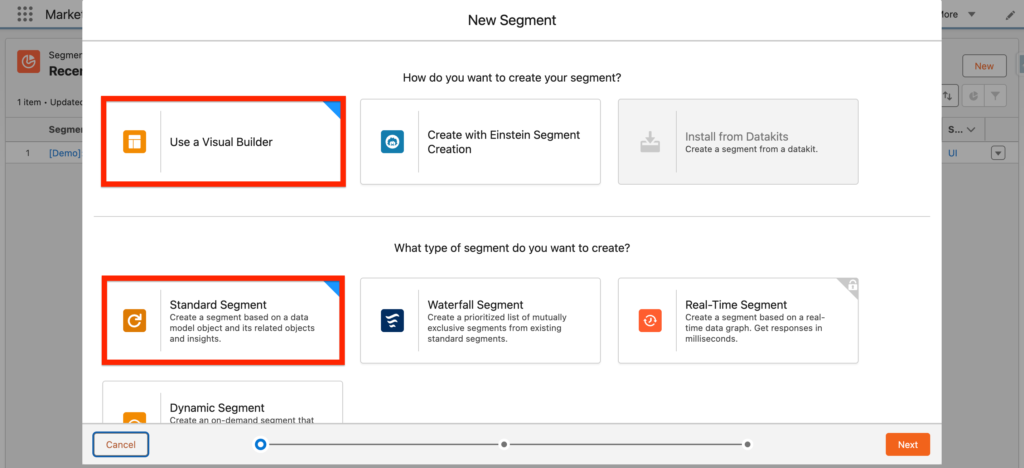
A pop-up window will open, and different options will be available to create the segment.
You will need to select one option within the section ‘How do you want to create your segment?’.
- Use a Visual Builder: We will select this option, that is the most common choice – allowing us to define the segment from an interface.
- Create with Einstein Segment Creation: This option allows you to create a segment from natural language… as in if you were asking ChatGPT to create a segment. Very interesting, WOW effect guarantee but you might triple check the set-up and results.
- Install from Data Kits: If you are familiar with Salesforce packages, Datakits in someway similar but specifically made for Data Cloud, you could upload a segment directly from a Datakit.
Defining the type of Segment #
Next, you will need to answer What type of segment do you want to create?
A range of options are available here as well including:
- Standard Segment: (our pick), this common option allows you to select a Data Model Object such as Unified Individual and related DMO to it and add some rules such as if this field attribute is part of ‘XYZ’ then include it into the segment
- Waterfall Segment: Waterfall Segments aren’t classic Segments. ****A Waterfall segment contains of Sub-Segments. A Waterfall Segment is built from ordered Sub-Segments. The objective is to ensure an individual belong to only a sub-segment listed within the Waterfall segment by level on importance.
- Real-Time Segment: A Real-Time Segment in Marketing Cloud Next is dedicated for more complex use-case. It will be populated from a Real-time Data Graph and can be used into Triggered Campaign Flows.
- Dynamic Segment: Dynamic Segments allow you to combine generic static ****conditions with dynamic conditions that change depending on the timing of the send (i.e the system will check if a attribute field is updated just before the email send).
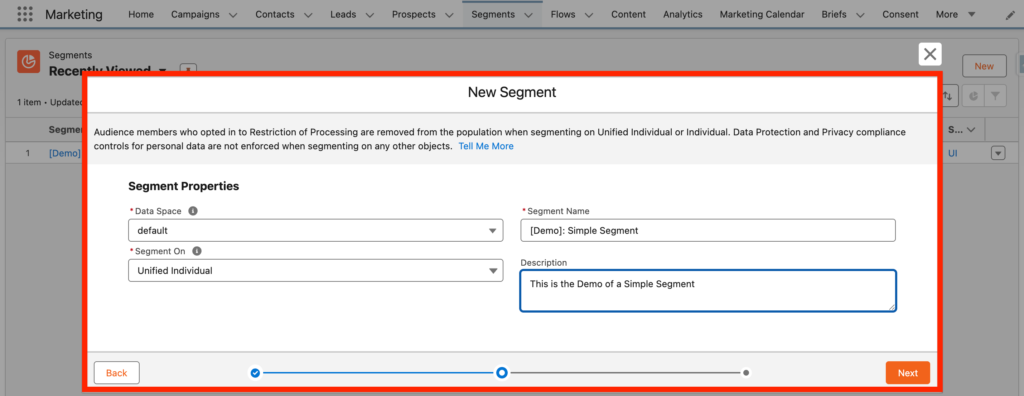
Defining the Segment Properties #
This step is straightforward, you will need to provide the following information:
- Data Space: default
- Segment Name: [Demo]: Simple Segment
- Segment On: Unified Individual (Data Model Object that is used for segmentation)
- Description: This is the Demo of a Simple Segment
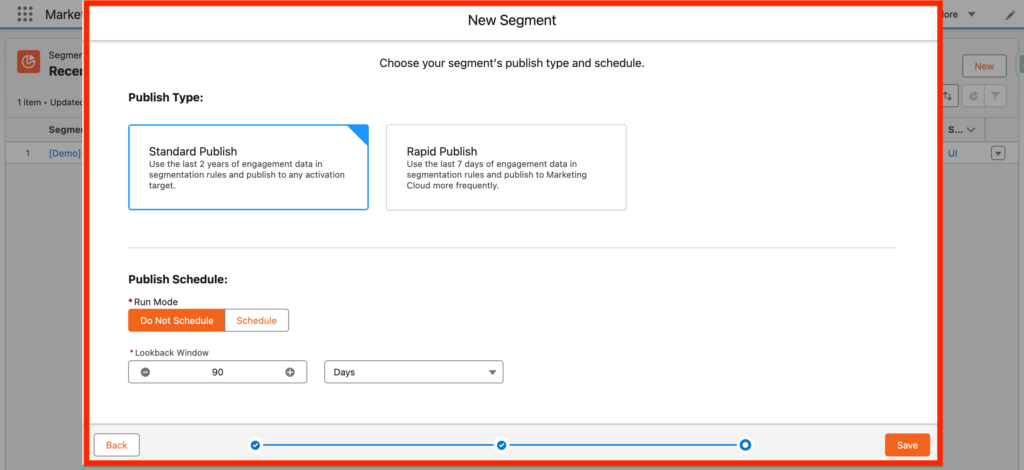
Next, you will need to choose your segment’s publish type and schedule. 2 options are available for the Publish Type:
- Standard Publish: This option will look-back to the last 2 years of Engagement Data (i.e. Opened an Email, Click on a Landing Page etc.) in the system and can be activated in any activation targets (Facebook ads, Google Ads etc.)
- Rapid Publish: This option will only look-back to the last 7 days of Engagement Data (i.e. Opened an Email, Click on a Landing Page etc.) in the system – however the refresh rate will be more frequent than in the Standard Publish.
And Finally, you will be able to select the Publish Schedule that is will allow you to refresh the segment on a basis (Hourly, Daily, Weekly, Monthly) and the Lookback Window that allows the system to retrieve data created X days, Week, Month ago.
Defining the Segment Criteria #
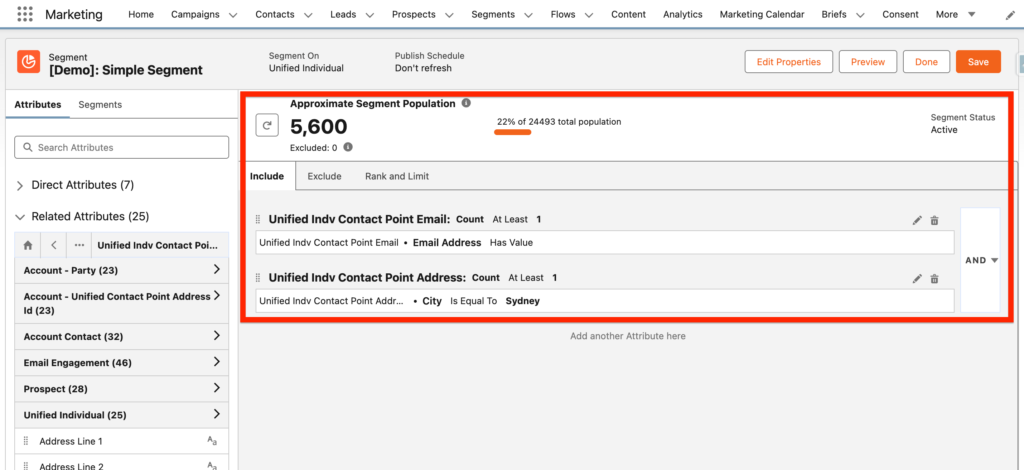
You will now be able to see the Visual Interface that will allow us to define the criteria to populate our segment. The left column will include the Direct Attributes that are part of the Data Model Object select in our last step, the Unified Individual Object and the Related Attributes, that represents the Data Model Objects connected to our Unified Individual Object.
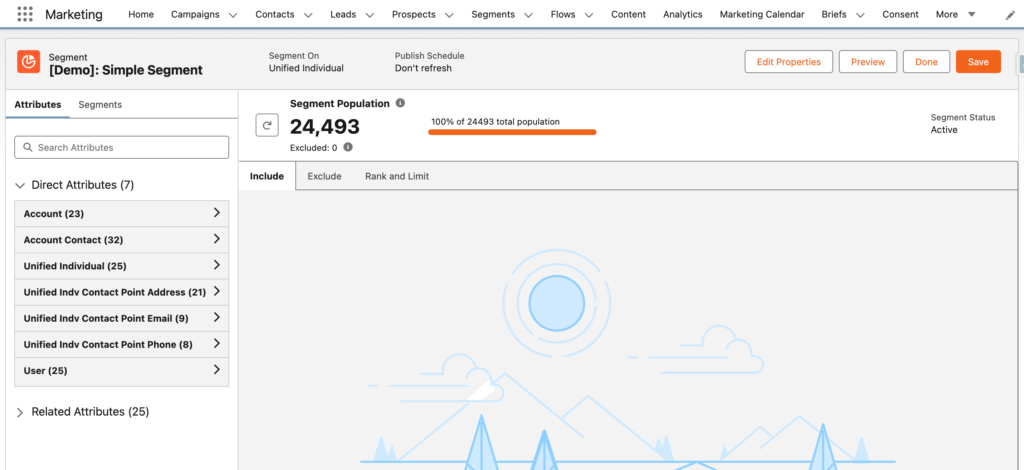
In our scenario, we are populating a simple segment that related on 2 criteria:
- All the Unified Individual with an existing Email Address (Leveraging the Data Model Object: Contact Point Email).
- All the Unified Individual that are living in Sydney (Leveraging the Data Model Object: Contact Point Address).
As you can see the Segment Population is equal to 5600 people. You can now click ‘Save’ and ‘Done’. The Segment Status should be set to ‘Active’ after a few seconds.
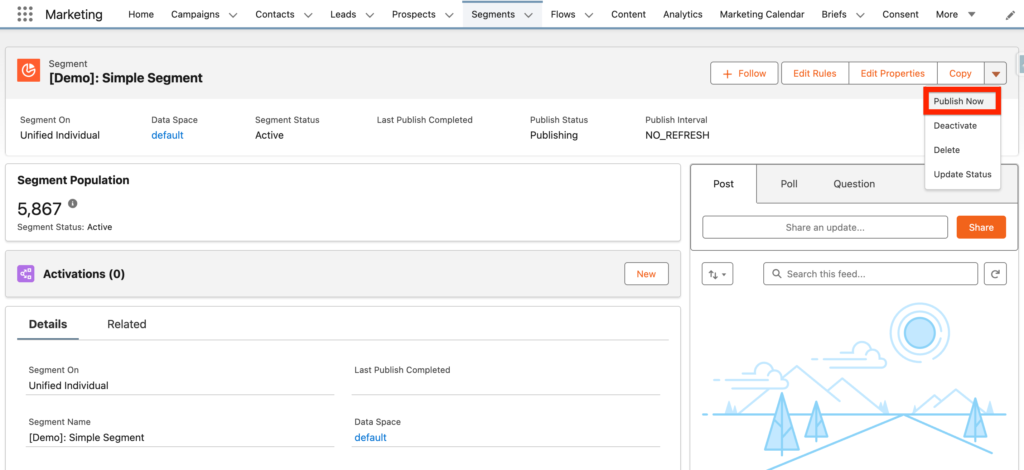
The Final step is to ‘Publish’ your segment so that it can be available within a Campaign Flow (Sending an Email) and/or an Activation Target (Facebook Ads, Google Ads).
Ressources:
https://help.salesforce.com/s/articleView?id=data.c360_a_create_a_waterfall_segment.htm&type=5
https://help.salesforce.com/s/articleView?id=data.c360_a_create_a_realtime_segment.htm&type=5
https://help.salesforce.com/s/articleView?id=data.c360_a_create_a_dynamic_segment.htm&type=5
https://help.salesforce.com/s/articleView?id=data.c360_a_create_segment_from_data_kit.htm&type=5


