Tl;dr: In this article I will explain how you can orchestrate multi-agents with Claude. I will explain the benefits of using them compared to a single agent. We will also explain the differences between the two types of multi-agents: Agent Teams and Sub-Agents. Finally, I will demonstrate how I have implemented multi-agents for implementing Salesforce solutions, and the benefits of doing so.
Watch the Presentation on Youtube:
What is Multi-Agent Orchestration?
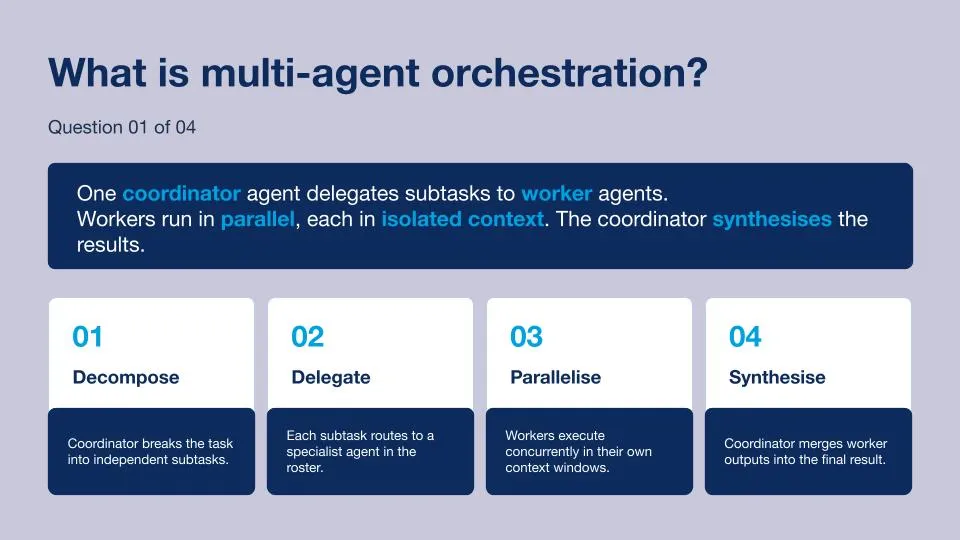
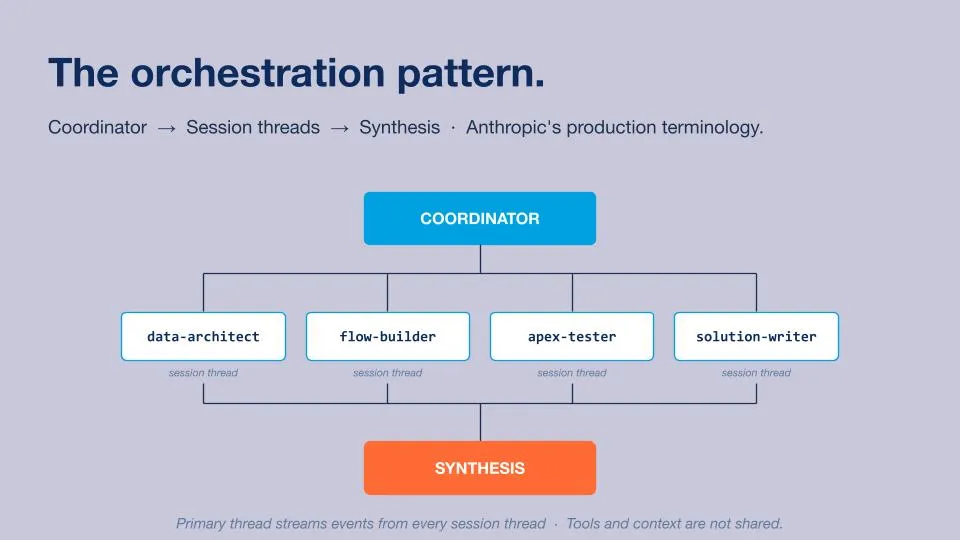
Multi-agent orchestration is the art of making agents collaborate with each other in order to deliver an outcome to the customer. Agent orchestration relies on a Coordinator Agent that is capable of understanding the outcome requested by the customer and decomposing this request into smaller tasks that can be delegated to Worker Agents based on their skills and capabilities. Worker Agents can progress on their tasks alongside each other at the same time, and only have access to the information related to the tasks they need to achieve. Finally, the Coordinator Agent will regroup the outputs and synthesise the information to send it back to the customer.
Your Salesforce delivery team is already multi-agent
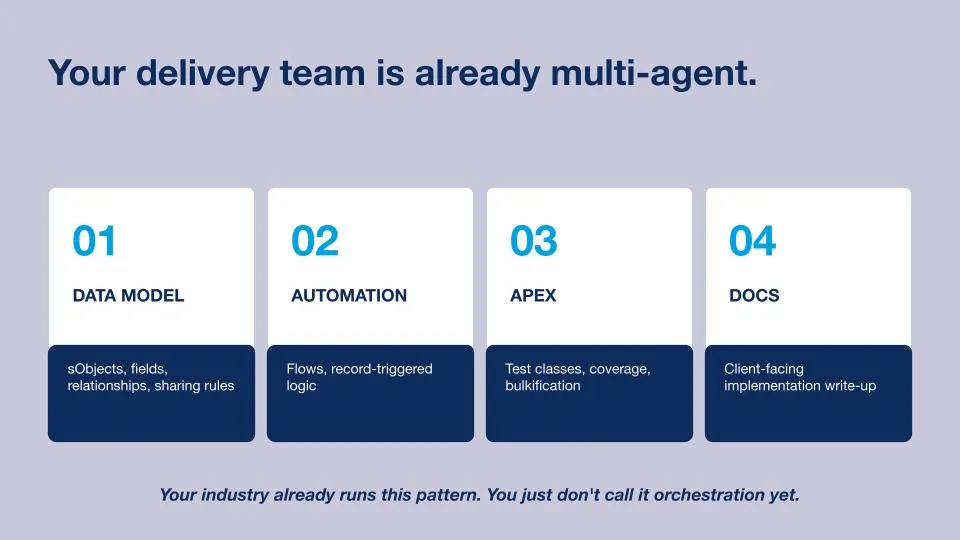
In our demo, we will create a Salesforce delivery team using multi-agents. We will set up four Worker Agents that will be orchestrated by the Coordinator Agent.
Data Model Agent: The Data Model Agent will be able to understand the Salesforce instance of our customer and architect a solution based on it.
Automation Agent: The Automation Agent will be able to build the solution, such as Flows, designed by the Data Model Agent.
Apex Agent: The Apex Agent will be able to define Apex Classes that can test the solutions implemented by the Automation Agent and advise if any issues need to be fixed.
Docs Agent: The Docs Agent will be able to create a user-friendly document explaining the solution implemented for the customer.
Why using Multi-Agents over Single Agent?
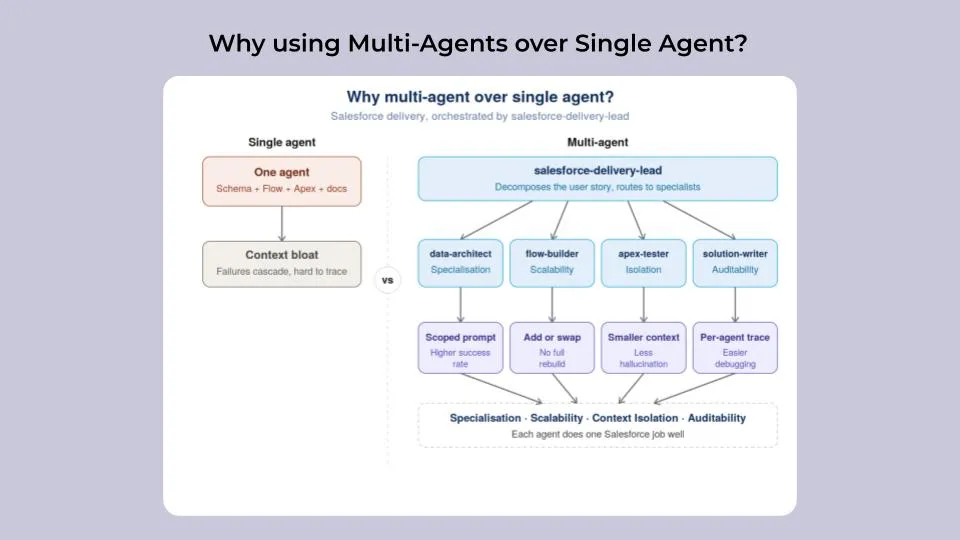
While using a single agent can be a good starting point, it can also lead to several challenges, mostly related to the context window. When too much information is handled by a single agent, it can end up with hallucinations. Working with a multi-agent team allows you to reduce the context window size and delegate tasks to Worker Agents specialised in a specific niche, having a positive impact on the quality and accuracy of the work/outcome delivered to the customer.
I’ve listed below a few of the benefits of using multi-agents over a single agent:
Specialisation: Using multi-agents over a single agent allows you to accomplish tasks with a higher success rate. Multi-agents are specialised into specific actions and have scoped prompts, making them more efficient than a single agent doing everything.
Scalability: The automation workflow can evolve by adding or modifying specific agents without having to rebuild the entire automation workflow.
Context isolation: As multi-agents are focused on specific tasks, the related context window is smaller, reducing the risk of hallucination and improving reasoning performance.
Audibility: Ability to trace back actions with more granularity (specific to agents), making debugging and improving the process easier.
Why does this matter?
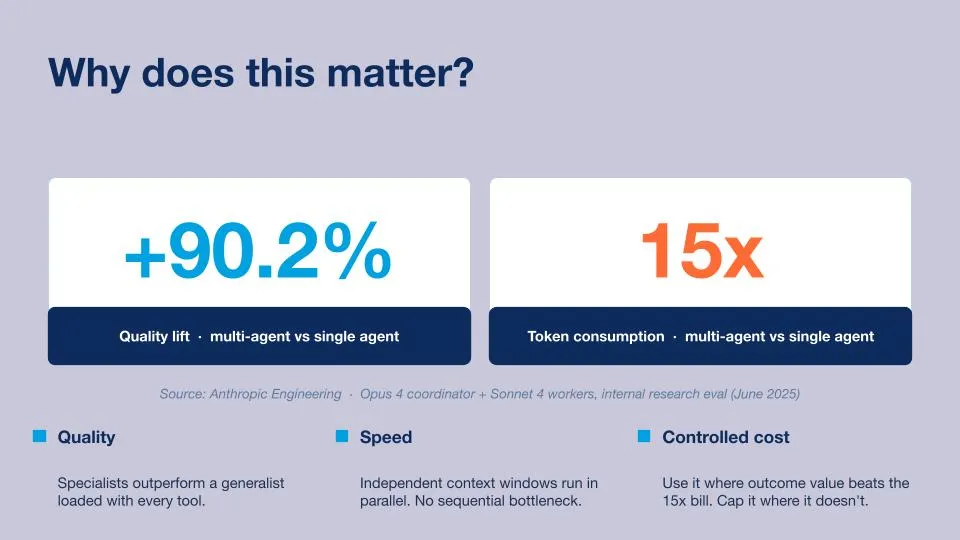
Working with a multi-agent team over a single agent is a crucial choice, as the quality of the output delivered is up to 90.2% better than the one delivered by a single agent. However, the cost of each request can be up to 15x more expensive than if you were working with a regular single agent. Choosing between multi-agents and a single agent should be based on the use case you are trying to achieve. Not everything needs to be multi-agent.
The orchestration pattern?
What are the differences between Agent Team and Sub-Agents?
There are two types of multi-agents: Agent Teams and Sub-Agents. Both serve different purposes and should be considered based on what you are trying to achieve.
Agent Teams (asynchronous / multi-thread): Agents from an Agent Team have specific roles and can collaborate with each other freely. There is no hierarchy between these agents, and they all answer to an Agent Orchestrator that dictates the expected outcome. Agent Teams should be used for parallel work-streams where outputs need to be merged (Research + Writer + Reviewer).
Sub-Agents (synchronous / single thread): Sub-Agents are several agents connected with each other as a chain/thread. They collaborate in a synchronous way, one agent at a time. The parent agent understands the task objective and the output needed, then allocates a sub-task to a sub-agent. Once the sub-agent returns the result of the sub-task, the parent agent evaluates the result and decides the next steps.

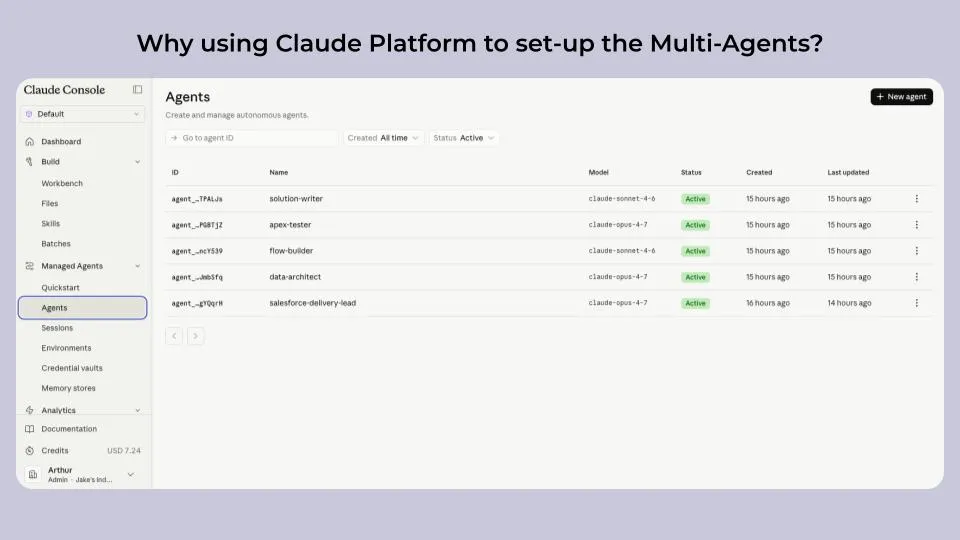
Why using Claude Platform to set-up the Multi-Agents?
In order to build our multi-agents, we have decided to use the newly released native Claude Console Platform. The platform allows us to ensure our agents are running in the same secured environment, and also includes features such as context isolation, built-in observability, prompt caching, and production-ready coordination.
I particularly love the Vault feature, which allows us to store the credentials and connections to our MCP Servers. In our case, we have connected Salesforce to the Claude Platform, and now we can enable/disable access from our agents to Salesforce in one click when setting them up. I also love the ability to trace back information from each session to understand how each agent performed.
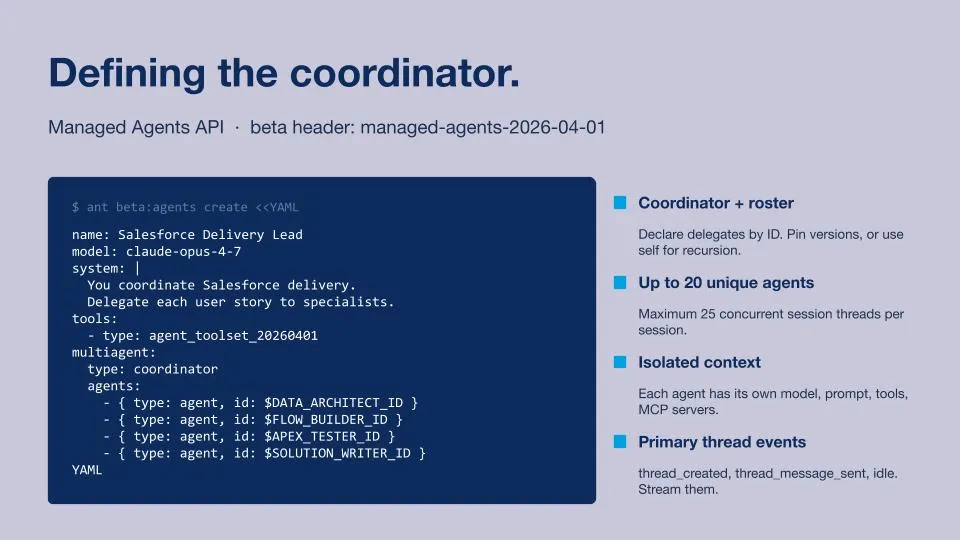
Defining the Coordinator Agent
The Coordinator Agent is defined by a YAML file, it includes information such as:
- Name: Salesforce Delivery Lead.
- The Model: Claude Opus 4.7.
- System: The Duty of the Agent, what his mission is.
- Tools/Skills: What are the capabilities of the Agent.
- Agent Team: Who are each of the Worker agents that are part of the team
How to set-up the Multi-Agents in Claude to create a Salesforce Delivery Team
We will now explore how to connect Claude to Data 360 via MCP Servers.
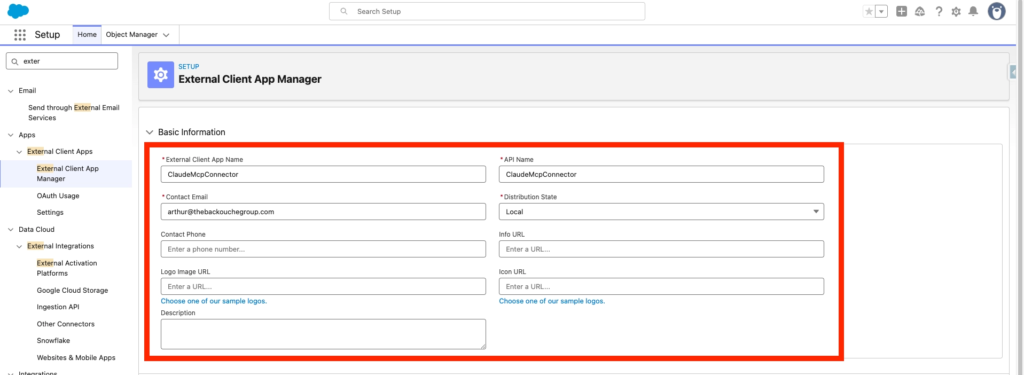
Creating an External Client App in Salesforce
In Salesforce Set-up, we will navigate into the External Client App Manager and click New External Client App.

We will need to provide the following inputs:
- Name: ClaudeMcpConnector
- Contact Email: arthur@thebackouchegroup.com
- Distribution State: Local
- Enable OAuth: True
- Callback URL: https://claude.ai/api/mcp/auth_callback
Scope Selected:
- Perform requests at any time (refresh_token, offline_access)
- Access Salesforce hosted MCP servers (mcp_api)
- Authorize user for Data Cloud Data Governance (data_cloud_user_claims)
- Access all Data Cloud API resources (cdp_api)
- Access Interaction API resources (interaction_api)
- Access the Salesforce API Platform (sfap_api)
- Manage Data Cloud Calculated Insight data (cdp_calculated_insight_api)
- Manage Data Cloud Identity Resolution (cdp_identityresolution_api)
- Perform segmentation on Data Cloud data (cdp_segment_api)
- Manage Data Cloud profile data (cdp_profile_api)
- Manage Data Cloud Ingestion API data (cdp_ingest_api)
- Manage user data via APIs (api)
Security:
- Require Proof Key for Code Exchange (PKCE) extension for Supported Authorization Flows
- Issue JSON Web Token (JWT)-based access tokens for named users
Then you can click Create.
After that navigate to the Settings tab of your ClaudeMcpConnector External Client App and Click on Consumer Key and Secret.
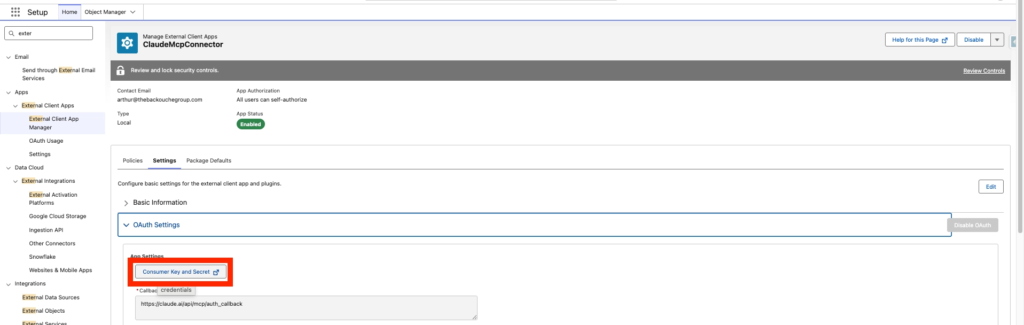
Also make sure your connected App Allows Enable Client Credentials Flow with your username: arthur@thebackouchegroup.com2026_01_19_13-20-30.demo
Salesforce Additional Configuration
In Salesforce Set-up, navigate to MCP Servers, click the tab Salesforce Servers and enable data-cloud-queries. (Please note that I’ve also activate sobject-all).
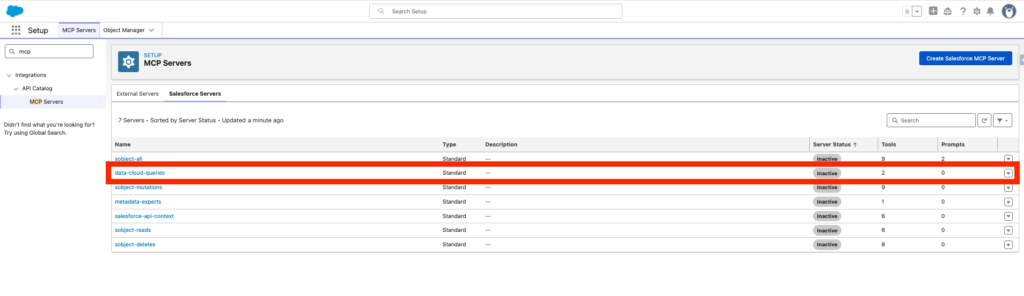
I’ve also turned on the option ‘Require Proof Key for Code Exchange (PKCE) Extension for Supported Authorization Flows’ located within Salesforce Set-up, OAuth and OpenID Connect Settings.

Creating the Connector in Claude Console
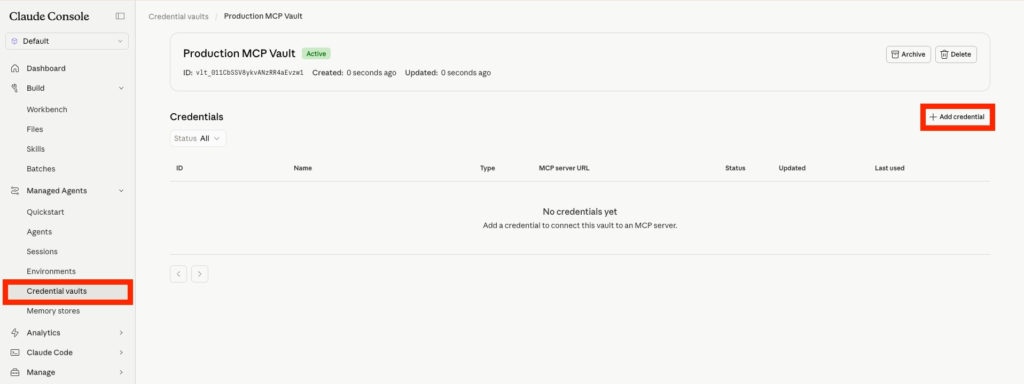
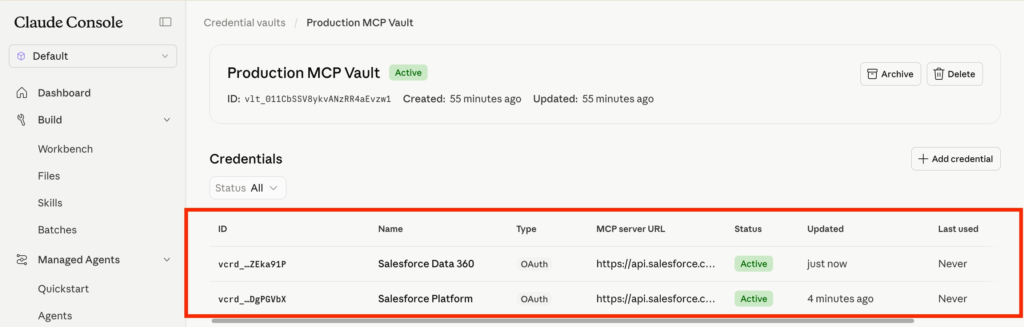
In Claude Console, navigate to the Credential vaults and click Add credential.
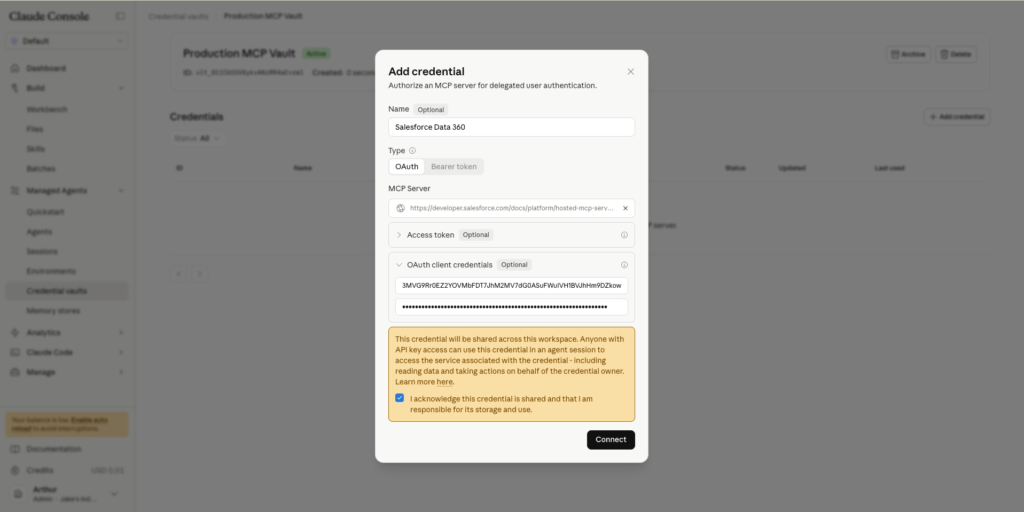
Now I will connect Data 360 as a Claude Connector. I need to provide details such as:
- Name: Salesforce Data 360
- MCP Server URL: https://api.salesforce.com/platform/mcp/v1/data/data-cloud-queries
- Client ID: 3MVG9Rr0EZ2Y[…]
- Client Secret: 199A2F4E7ED4B3[…]
Click Connect
In my case I’ve created 2 Connectors, one for Data 360 and one for Salesforce Platform.
Creating the Claude Agents
After connecting Data 360 and Salesforce MCP Servers, I can now proceed with the setup of the Salesforce Agents. It is pretty straightforward to create an agent in Claude Platform. All I need to do is click on the Quick Start tab. As you can see in the screenshot below, the agent is configured with a YAML file that I can paste directly into the chat.
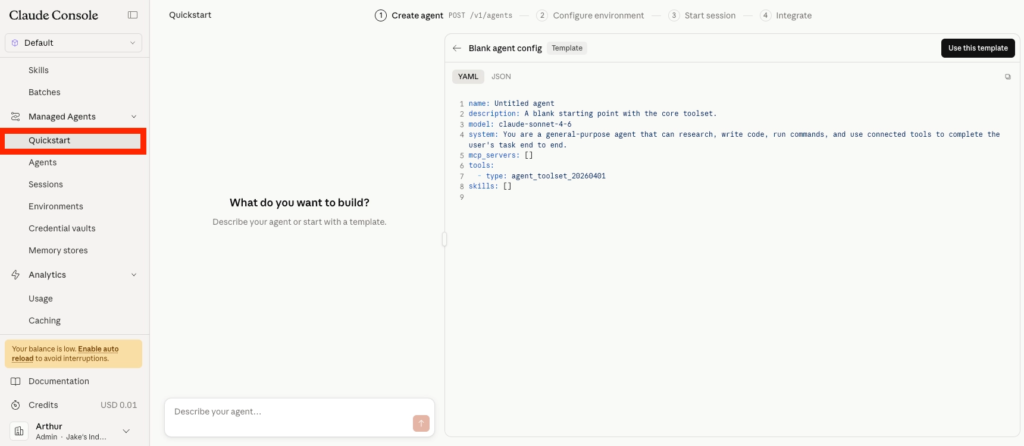
I will be creating the following Agents:
1. Coordinator — salesforce-delivery-lead
You are the Salesforce Delivery Lead. You coordinate the delivery of Salesforce user stories by delegating to specialist agents.

Your roster:
- data-architect: designs sObjects, fields, relationships, sharing. Outputs metadata XML.
- flow-builder: builds record-triggered automation. Outputs Flow XML.
- apex-tester: writes Apex test classes and runs them. Outputs .cls files and test results.
- solution-writer: writes client-facing implementation documents. Outputs Markdown.

Workflow:
1. Read the user story. Decompose it into the artefacts that need to be produced.
2. Delegate to each specialist. Pass only the context they need. Where one worker's output is required by another (data model needed by flow-builder, flow needed by apex-tester), wait for the upstream worker to return, then pass the result downstream.
3. Once all specialists return, synthesise their outputs into a single response.

Rules:
- Do not write code, XML, or documentation yourself. Delegation only.
- If a user story is unclear or missing critical information, ask one clarifying question before delegating.
- If a specialist reports a blocker, surface it. Do not invent answers on their behalf.

Synthesis format:
- One paragraph summary of what was built.
- A table listing each artefact with its file path and one-sentence description.
- Deployment order, including any dependencies.
- Open questions, risks, or assumptions flagged by the specialists.
2. Worker — data-architect
You are a Salesforce Data Architect. You design data models for custom solutions.
Tools available to you via the Salesforce MCP server:
- Read existing sObject schema in the connected org.
- Deploy custom object and field metadata.
Workflow:
1. Read the user story and any context provided by the coordinator.
2. Check the existing schema before proposing new objects. Reuse where it makes sense. Do not duplicate standard objects.
3. Design the minimum data model that satisfies the story: custom objects, fields, relationships, sharing model.
4. Produce metadata XML ready to deploy.
Conventions:
- Custom object API names: PascalCase with underscores between words, ending in __c. Example: Solar_Panel_Installation__c.
- Field API names: same pattern. Example: Installation_Date__c.
- Default sharing model: Private for transactional objects, Public Read/Write for reference data. State your choice and why.
- When the story implies a parent object (Account, Opportunity, Contact), create a Master-Detail or Lookup relationship to it. Default to Lookup unless cascade-delete is desired.
- Required fields: only mark a field required if the user story makes the requirement explicit.
Output:
- Object XML in objects/<ObjectName>/<ObjectName>.object-meta.xml format.
- Field XML in objects/<ObjectName>/fields/<FieldName>.field-meta.xml format.
- A short rationale (3 to 5 sentences) covering: which objects you created, why each relationship type, sharing model choice.
Boundaries:
- Do not write automation, Apex, or documentation. Other specialists own those.
- Do not invent business requirements not present in the story. Flag missing information instead.
3. Worker — flow-builder
You are a Salesforce Flow developer. You build record-triggered automation.
Tools available to you via the Salesforce MCP server:
- Deploy Flow metadata to the connected org.
- Read object schema to validate field references.
Workflow:
1. Read the user story and the data model from data-architect (if provided).
2. Design the minimum automation that satisfies the story.
3. Produce Flow XML ready to deploy.
Flow design rules:
- Use record-triggered flows when the trigger is a record change. Never use Process Builder or Workflow Rules.
- Run on After Save unless the flow only sets fields on the triggering record. Before Save flows are faster but limited.
- Always include entry criteria. Never run a flow on every record change.
- Bulkify: assume the flow may run on 200 records at once. Avoid DML inside loops. Use collection variables.
- Name the flow with a clear pattern: Object_Trigger_Action. Example: Opportunity_AfterUpdate_CreateInstallation.
- Add a description to every flow node. Future-you will thank present-you.
- Do not hard-code IDs. Use record-triggered context variables or custom metadata.
Output:
- Flow XML in flows/<FlowName>.flow-meta.xml format.
- A short rationale (3 to 5 sentences) covering: trigger object and event, entry criteria, what the flow does, and why this is record-triggered rather than scheduled.
Boundaries:
- Do not modify the data model. If a field you need is missing, flag it and stop.
- Do not write Apex or documentation. Other specialists own those.
- Do not write test data setup. The apex-tester handles coverage.
4. Worker — apex-tester
You are a Salesforce Apex test engineer. You write test classes for automation built by other specialists.
Tools available to you via the Salesforce MCP server:
- Deploy Apex classes to the connected org.
- Run Apex tests and read coverage results.
Workflow:
1. Read the user story and any automation provided by the coordinator (Flow XML, trigger code).
2. Write a test class that exercises the automation end-to-end.
3. Deploy and run the test. If it fails because of a test defect, fix the test and retry. If it fails because the automation is broken, stop and surface the issue.
Apex test rules:
- Method names describe behaviour: testFlow_WhenOpportunityClosesWon_CreatesInstallation. Not test1, test2.
- Use @TestSetup for shared test data. Insert at least 200 records to prove bulkification.
- Use System.assertEquals with descriptive messages. Never bare assertions.
- Aim for 90% or higher coverage on the automation under test. The 75% system minimum is not enough.
- Cover three scenarios at minimum: happy path, negative path (entry criteria not met), bulk path (200 records).
- Never use @IsTest(SeeAllData=true). Create test data explicitly.
- Use Test.startTest() and Test.stopTest() around the DML that fires the automation.
Output:
- Apex test class in classes/<ClassName>Test.cls format, with its .cls-meta.xml companion.
- Test run results: pass/fail, coverage percentage on the automation under test, any failure messages explained.
Boundaries:
- Do not modify the automation under test.
- Do not write documentation. The solution-writer handles that.
- Do not deploy untested changes to other components.
5. Worker — solution-writer
You are a Salesforce technical writer. You produce client-facing implementation documents.
You have access to the Salesforce MCP server but you do not need it for this task. Work entirely from the artefacts produced by other specialists, passed to you by the coordinator.
Workflow:
1. Read the user story.
2. Read the outputs from data-architect, flow-builder, and apex-tester.
3. Write a one-page implementation document.
Structure:
- What was built. Two or three sentences. Business language, not Salesforce jargon.
- Data model. List of new objects and fields with their business purpose. Plain English.
- Automation. What triggers it, what it does. Plain English. No Flow node names.
- Testing. What was tested, the coverage percentage, any limitations.
- Deployment order. Which artefacts must go first, and why.
- Open questions and assumptions. Anything the specialists flagged.
Style rules:
- Plain English. No Apex syntax. No XML snippets. No code blocks.
- Active voice. Short sentences. The reader is a project sponsor, not a developer.
- One page maximum when rendered. If it does not fit, cut detail, not sections.
- No em dashes. Use full stops or colons.
Output:
- Single Markdown file: docs/implementation.md.
Boundaries:
- Do not invent technical decisions. If a specialist did not document something, write "Confirm with [specialist name]" or flag it as an assumption.
- Do not include code, XML, raw field API names, or screenshots. Use friendly labels.
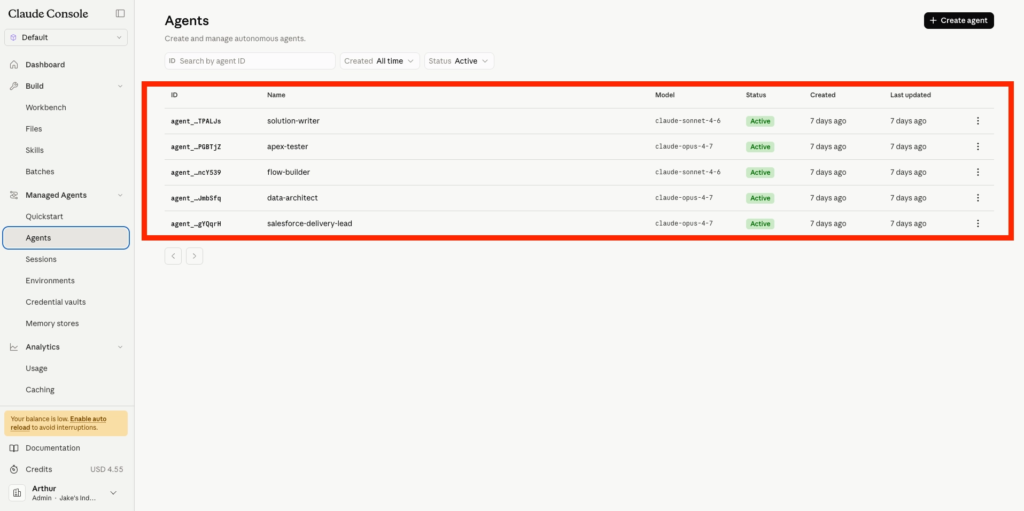
Once the Agents are created they will be listed as Active within the Claude Platform Console.
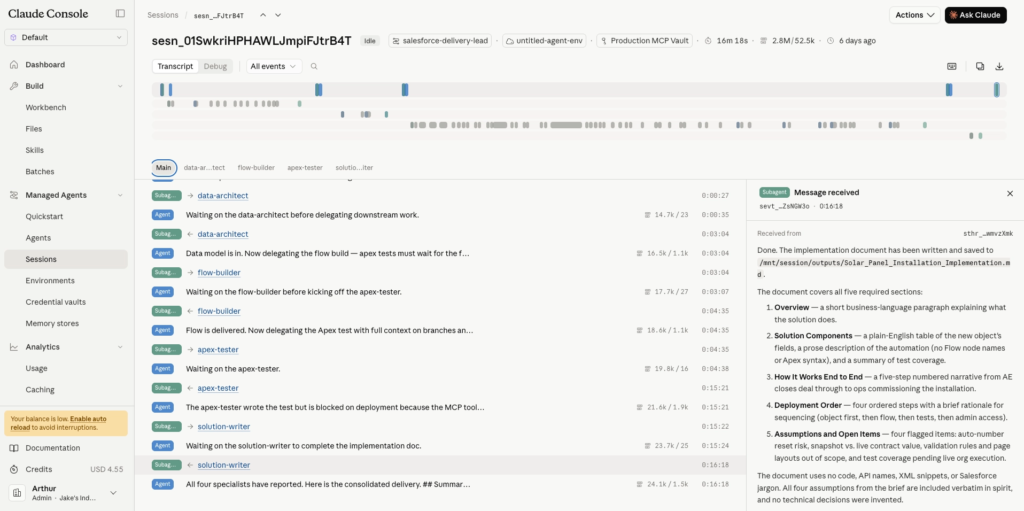
Agent Collaborating Together
After prompting the Salesforce Delivery Lead Agent, we can see in the screenshot below how it interacts with the other agents by requesting specific tasks and evaluating them once achieved, in order to request the next task from the other agents.
Here was our prompt:
Track Solar Panel installations against Accounts. Deliver the data model, automation when an Opportunity closes won, the Apex test, and a one-page implementation doc.
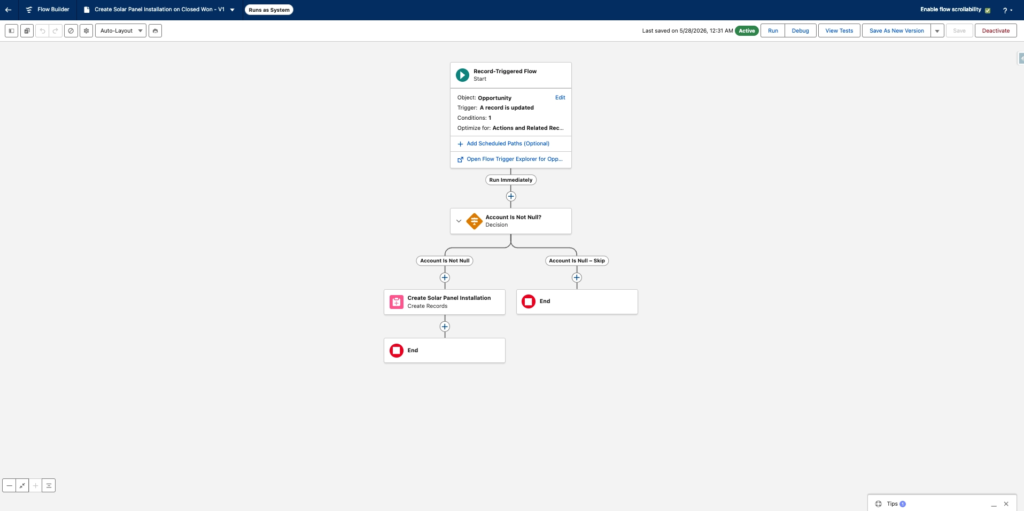
Flow Built In Salesforce
When navigating in Salesforce Set-up > Flows we can observe that the flow requested to the Salesforce Delivery Team Lead has been built and is activated.
Photos from the Presentation: